October 13, 2009

Winner Winner Chicken Dinner

Congratulations to our lucky winners! Stay tuned for more fabulous QuicKutz contests.

Kirk's Disneyland Layout Titles:
DeniseB said...

#1 "WITCH way to Disneyland?"
#2 "The wonderful thing about Tiggers...."
#3 "Princess for a Day"
#4 "Who's the big duck in the middle?"
or, "Duck, Duck, Goose"

Amy's Embossing Folder:

Winner #1:

"Hello! I just received my new epic 6 tool recently...my very first die cutting system the only problem is I only have one embossing folder and one die cut plate. I would love to have the embossing folder that you used in your layout the retro diamond. Thanks for this chance." Angela

Winner #2:

"I'd have to say the spiderweb border or the graveyard folder because I just LOVE Halloween!"

Contact us at designteam@quicktuz.com to claim your prizes!

October 12, 2009

Homemade Leaves

Fall is one of my favorite times in Michigan. The leaves are changing color, the weather is a bit brisker and I love energizing walks that provide a bounty of nature’s color to enjoy.

It is cold and windy here, so I am enjoying some time in my craft room while thinking about the changes going on around me. I've recently created some fun backgrounds that are perfect for die-cutting fall leaves. I would like to share this technique with you today.

Let's first assemble our supplies:

Light cardstock- creams and tans work (cut into 4x4 and 2x2)

3-5 Ranger distress inks (orange, green, yellow, brown, and red shades provide a nice palette)

Mini mister or spritzer bottle filled with water

Craft mat, or other non-poruous work surface that you can apply inks directly onto

Heat tool of some sort

QK tool

Assortment of leaf dies


Step 1:

Directly apply your ink to your craft mat. I like to place the ink-side down, apply a bit of pressure, give a ½ turn and lift. Apply a second color close to the first (but careful not to touch the two colors, thus avoiding transfer of the first color to your pad.) Then apply a third color.

Step 2:

Lightly mist the ink. (It will bead up a bit.)

Step 3:

Pick up a piece of your textured or smooth cardstock and place it in the center of your misted inks. While keeping it down, twist and turn it to transfer the ink from your work surface to your paper. Take a peek, if it's not completely covered with ink, place it back down and twist again. Your cardstock should now be wet with the blended ink. If you prefer more color, you may repeat the first step, but be cautious that you don’t end up with a muddy brown.

Step 4:

With a dry paper towel, wipe the remaining ink off your work surface. Dry your cardstock using a heat gun.
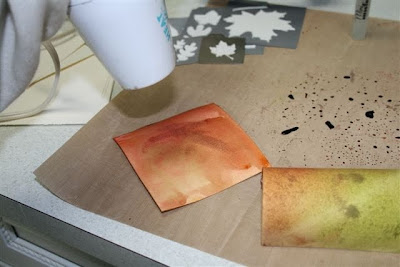

I like to prepare a selection of backgrounds before I cut my shapes. You can achieve different looks depending on your ink selection, paper color and texture.

Step 5:

Choose your die(s) and assemble on your platform, apply paper, cover with your cutting mat and turn the handle.


You will soon have as assortment of leaves to use on your fall projects!

I need to take care of some “Mom Duties”, but I will meet up with you in the Community Gallery later to share a layout or two using my leaves.

Hope you enjoy!

Off and running,

Sandy, QK Ambassador


October 9, 2009

Paper doll fun

I have been given the fun task of blogging. I don’t normally blog, so please bear with me!

First off—just a little bit about me. I’m a Taurus, I like long walks on the beach, and I like to find the essence from within… No, seriously, I am a Taurus and my wife and I love taking walks on the beach. (Who doesn’t?) We just celebrated our eighth anniversary, and we are expecting our first child (a boy). I am new to QuicKutz, but I have been doing sales and retail for over ten years, so even though QK is new to me I feel right at home.

Since my wife is expecting, my sister threw her a baby shower where one of the activities was to make paper dolls from our new October release. This activity was a chance for me to receive great feedback on both the Epic 6 tool and our new paper doll release from women who are new to QK products and scrapbooking.

And the response was great! I had two of our Epic 6 demo tools there for the women to use and they spent a couple of hours cutting away and making some cute dolls….and some “interesting” dolls, too. : )

These women had a lot of fun being creative and mix ‘n matching the clothing, as only women can do! One of the ladies had a great idea to put magnets on the back of both the doll and the clothing so she could put them on her fridge and let the kids change the clothes as often as they want. Great fun was had by all, and I was once again reminded how versatile QK products are in every situation.

October 5, 2009

Holiday kick-off

Wow! I can't believe we are already in October! My how 2009 has passed. I know 2009 has brought about many changes for most of us on a personal and a professional level. Our company has gone through many changes and challenges, too. But things are looking better than ever, and we’re excited for the holiday season and the great items scheduled to arrive in our warehouse over the next couple of months.

Our new L Letterpress will be arriving. We have a whole slew of Epic Six tools coming into our warehouse. The 2009 Holiday Gift Sets will be announced at the beginning of November and I think you’ll find these will be the most versatile sets yet. Exclusive products for Thanksgiving and Christmas will soon roll into our warehouse, as well.

My family and I decided to kick off this holiday season by going to Disneyland and visiting Jack Skellington and his band of spooks. We had a great time visiting Mickey and friends and seeing the fun clash between Halloween and Christmas. We saw pumpkins with Christmas caps and skeletons with fun little gifts. It was truly enjoyable to be with my family and to de-stress a little.

Upon returning from our fun-filled week in Southern California, the stress soon returned as I looked at our photos and couldn't come up with good titles for our scrapbooking pages. For this reason I am coming to you—I need your help in assigning titles to our Disneyland photo layouts. Please look through these photos and let me know what you think. If I end up using one of your titles, a free QuicKutz die is coming your way! :)

Happy holidays,

Kirk


October 1, 2009

More than meets the eye...


Ta Da! It feels like it's been a while since I sat down and did a scrapbook layout just for me! I almost forgot how much fun it is. Pretty basic, right? (Typical Amy. I like a lot of white space.) I used the old Monograms for the 'W' and my favorite alphabet, Marigold, for the 'altons' and "I just love 'em" was cut out in Oatmeal.

But wait... This scan is a good overview, but it blows out a lot of the cool detail.

Check out this sweet pattern from the QK embossing folders. (The photo shows it much better.) I LOVE, LOVE, LOVE this pattern. It's the Retro Diamonds border embossing folder (EF-BDR-028) and it totally matches the pattern on my paper. I also love the retro squares and the hounds tooth and the dots.... well, there are a lot. They're the perfect accents for my simple style. Which embossing folders best fit your style? ...because I just may have some for one lucky commenter.

September 25, 2009

Calendar Ideas

Dear loyal QuicKutz community,

Theron, here. As my blog entry this week, I decided to share something very special with you: my beautiful family!

Actually, my wife Katie deserves all the credit. She put together this awesome 2009 calendar using mostly QuicKutz products. Check out her talents, take some ideas and comment on the pictures if you'd like.

I now present to you, the Anderson family: Theron, Katie, Lucy and Claire.

Enjoy!
Theron


September 23, 2009

Fun Fall Project Ideas

Hello everyone,

Happy Wednesday!

Let me just start this entry by saying, “Hello, my name is Andrea and I am a fully functioning QuicKutz Addict.”

I have been addicted to QK since 2004 when I started working at my LSS and found my first supplier. When my (then) fiancĂ© gave me my first Squeeze (no, not a physical embrace but the pink Squeeze with the Olivia font included – sigh), I felt the joy that only QK can bring.

Since then, I have branched out to many other QK products which I love. I'd like to tell you about a couple of fun QK fall projects I’ve been working on lately.

First, I saw a cute “BOO” table top decoration idea in a magazine and I decided to challenge myself to create something similar using only QK products. I can happily say that I was successful! I used both my Silhouette and my Revolution to create my projects. I used the fence, crow, cat and spider web dies and then spelled out “BOO” on my Silhouette. I think it turned out great!


Secondly, I recently finished two fall layouts that were super fun and easy to create using the QK’s latest released dies and a couple of Silhouette images. Note on my first layout how I used die-cut shapes as masks for a color spray. I then used my actual die-cut shapes and offset them from my sprayed image so that I could have a nice background. This technique really adds some extra punch to cards or pages.


One of my favorite masking techniques is to use my actual metal die and then fit my die-cut shape into the outline–you can see I’ve done this on my Halloween layout.


If you are having a Halloween party, don’t forget to look at your Silhouette shapes. I used the 3-D coffin for a little treat box, the 3-D pumpkins with a battery votive inside and, of course, there’s the cupcake wrapper! So spooktastic!

Lastly, I had to share this wedding gift idea I created for a couple who were recently married. I used my Silhouette machine, cut their last name initial from vinyl, and etched it onto a glass vase I'd bought for them. I love the classy look initials bring. I hope a personal, handmade gift will really tell them how much they mean to me!


It was lovely sharing with all of you other QK addicts! I would love to hear any questions or comments that you may have–ideas are always appreciated, as well. If you would like to keep up with me and my QK antics, please visit my blog at http://andreayokley-jessup.blogspot.com

Thanks for taking time out of your day to visit!

QK Smiles,
Andrea Yokley-Jessup, QuicKutz Ambassador