Fall is one of my favorite times in
Michigan. The leaves are changing color, the weather is a bit brisker and I love energizing walks that provide a bounty of nature’s color to enjoy.
It is cold and windy here, so I am enjoying some time in my craft room while thinking about the changes going on around me. I've recently created some fun backgrounds that are perfect for die-cutting fall leaves. I would like to share this technique with you today.
Let's first assemble our supplies:
Light cardstock- creams and tans work (cut into 4x4 and 2x2)
3-5 Ranger distress inks (orange, green, yellow, brown, and red shades provide a nice palette)
Mini mister or spritzer bottle filled with water
Craft mat, or other non-poruous work surface that you can apply inks directly onto
Heat tool of some sort
QK tool
Assortment of leaf dies

Step 1:
Directly apply your ink to your craft mat. I like to place the ink-side down, apply a bit of pressure, give a ½ turn and lift. Apply a second color close to the first (but careful not to touch the two colors, thus avoiding transfer of the first color to your pad.) Then apply a third color.

Step 2:
Lightly mist the ink. (It will bead up a bit.)
Step 3:
Pick up a piece of your textured or smooth cardstock and place it in the center of your misted inks. While keeping it down, twist and turn it to transfer the ink from your work surface to your paper. Take a peek, if it's not completely covered with ink, place it back down and twist again. Your cardstock should now be wet with the blended ink. If you prefer more color, you may repeat the first step, but be cautious that you don’t end up with a muddy brown.

Step 4:
With a dry paper towel, wipe the remaining ink off your work surface. Dry your cardstock using a heat gun.
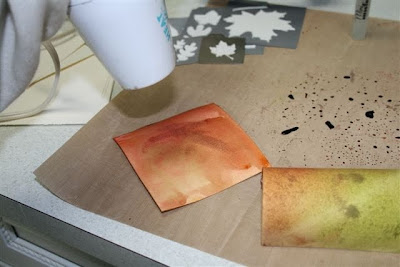
I like to prepare a selection of backgrounds before I cut my shapes. You can achieve different looks depending on your ink selection, paper color and texture.

Step 5:
Choose your die(s) and assemble on your platform, apply paper, cover with your cutting mat and turn the handle.

You will soon have as assortment of leaves to use on your fall projects!

I need to take care of some “Mom Duties”, but I will meet up with you in the Community Gallery later to share a layout or two using my leaves.
Hope you enjoy!
Off and running,
Sandy, QK Ambassador


 The finished product! Happy Halloween to each of you!


