January 29, 2010

QuicKutz Cares


QuicKutz has always had a special affinity for Haiti, a country with a rich history and a population of kind, beautiful people. QuicKutz inventors and founders Mark & Natasha Hixon adopted three children from Haitian orphanages, and shared many of their experiences with us at corporate. In an effort to continue to support the orphanages after the adoptions, Natasha organized efforts to produce a cookbook that was sold through the QuicKutz sales channels, with all proceeds going to an orphanage in Haiti. We sold all but 12.

As you can imagine, children all across Haiti are suffering because of the recent devastating earthquake. Many of the orphanages, particularly those in the Port-au-Prince area, are struggling to provide the children with drinking water and food, in addition to safe, sanitary living quarters.

The Foyer de Sion Orphanage, an operation of three orphanage locations in Haiti, is in particular need of help. Two of the three locations where they operate were completely destroyed in the quake. Miraculously, none of the children were critically hurt during the earthquake, though several of their caregivers passed away. The children who lived in the two buildings that collapsed are now temporarily staying in a nearby church.

You have the chance to make a difference in the lives of these children. QuicKutz is auctioning off some of the best dies and products in our archives, including those one-of-a-kind products that QuicKutz collectors go crazy over. Proceeds will be donated to the Foyer de Sion Orphanage and to Holt International, two organizations looking out for the welfare of the Haitian youth.

Stay tuned over the next week to view the auctioned items on quickutzinc.blogspot.com, and enter in your highest bid! QuicKutz thanks you, and the people of Haiti thank you.

For more information on the Foyer de Sion Orphanage or Holt International, please visit the following links.

http://www.foyerdesion.org/

http://www.holtinternational.org/

January 28, 2010

Super Bowl or Bust!

Super Bowl 44 is right around the corner....are you ready?? It's time to pull out your dies and put them to good use by making some football décor to get in the mood for the big game, or even for a “Super Scrap” party!

My son, hubby and I are all football fans and will have people over to watch the game. I thought it would be fun to make this banner in our entryway to direct our friends towards the snacks and the big game playing on t.v. At the moment, however, my son has confiscated the sign for his room....to 'keep it safe', he assures me!


I started this project by first pulling out all football themed or related dies, then narrowed them down to the following, along with fonts:

-University Grand Alphabet (what other alphabet could work better for a sports themed project?!)
-Football REV-0100
-Arrows REV-0003
-Banner REV-0155
-Grass REV-0183
-Chicken Noodle skinnimini 4x4 REV-0222
-License Plate 4x8 mini alphabet
-Banana Split 4x8 skinnimini alphabet
-Sticky Note 4x8 mini alphabet
-Santa's Workshop -- Wintergreen page and folder insert

Next I chose paper and cardstock and started cutting, arranging, rearranging, and rearranging some more. I added glue, ribbon and eyelets and viola!...a banner was born! I even opted to use the Wintergreen folder insert to give myself a pocket where I could store strips of paper containing Super Bowl trivia questions. What fun we'll have trying to figure out who knows the most trivia. (Though I'm sure it will be me!)


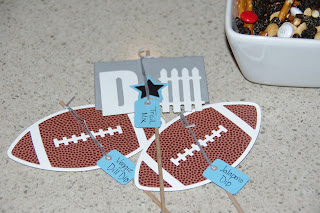
Once I finished the pocket, I didn't want to stop there. I used the football, picket fence border, nesting stars, nesting rectangles, QK Club tag and Diesel Grand Alphabet to make food labels for the snack table. I will put them into dips, snacks and other foods to let everyone know what's around to eat. These tags are also perfect to indicate if a salsa or dip is spicy, mild, etc.

To make the tags, I simply cut out my shapes and adhered them together. I then cut a dowel rod to size and adhered the shapes to the dowel. So easy!

I hope these ideas spark some of your own ideas, whether you’re using them for a Super Bowl party or a Super Scrap party. Pull out those dies, put your own twist on the idea, and have some fun!

Thanks to QuicKutz Design Team member Pam Gandolfi for this great idea!

Who are you routing for, the Saints or the Colts?

January 26, 2010

Corrina's Projects

For those of you who have not seen winner Corrina's darling projects, here they are!


January 25, 2010

Contest Winner!

Thanks to all of our ingenious crafters who entered the "That Die" contest! We had an overwhelming response to the contest, so much so that it took us a little longer than usual to narrow them down to our very favorites.

Without further adieu, we'd like to announce the winner...(drum roll, please)...

Corrina of Perth, Australia!

Congratulations, Corrina! You've won $100 worth of QuicKutz products. Your use of the pirate ship (REV-0081) was just too cute to boot.

More fun contests and surprises to come!

Love,

The QuicKutz Team

January 20, 2010

Decorative Baby Wipe Box

Raise your hand if you are tired of looking at your diaper wipe box. Me too! I came up with this idea when my first son was born. After looking at his diaper wipe box on top of his changing table in his perfectly decorated nursery I decided that I needed to make it something worth looking at! Sure enough, almost three years later, we are still using the same wipe box. I still love looking at it! Now that boy #2 is on his way, I wanted to make one to match his nursery. With a little Modge Podge, cute paper and a little creativity, you can create a diaper wipe box you will love. And the best part? It only takes one nap to complete! (About 2 hours.)


Materials:
Modge Podge
Foam Brush
Patterned Paper (as many as you like, I used one 12x12 and a few scraps)
Solid Colored Cardstock (again, as many as you like, I used scraps of 5 colors)
QK Dies (I used convertible KS-0995, double star RS-0617, Blossom Classic Alphabet BLOSSOM-G, and nesting circles CC-CIRCLES-01)
Any other embellishments you want to add (I used buttons and thread)


Step One:
Make your pattern. Simply lay a thin sheet of office paper over the sides and top of your box, then carefully trace the edges of the box. Cut out and retrace until you have exactly the right dimensions. This step is the hardest part of the project—it took me three tries to get it right

Step Two:
Cut your patterned paper. I wanted to keep my box fairly simple, so I cut the front, back and sides from the same pattern. I used a different pattern for the top.


Step Three:
Modge Podge the paper to each side and top. Allow a few minutes to dry (I waited about 15 minutes)


NOTE: If you want to distress the edges with ink do it before you Modge Podge your paper. If you want to outline the papers like I did, wait until step seven.


Step Four:
While you are waiting for the Modge Podge to dry, cut out your QK shapes. I cut the word "Wipes" from Blossom Classic (I am using this font throughout my little one's room, so I wanted everything to be the same font.) I cut the convertible to match the patterned paper. The wheels were a little bigger on the paper, so I used nesting circles to create larger wheels. I then cut stars to mimic the paper as well. For the top I used the nesting circles again to create a little monogram spot. I added the outside of the double star and another star to decorate the "J".


Step Five:
Now here comes the fun part! Use Modge Podge to adhere all of your QK shapes.

Step Six:
Wait until it dries completely. This part is crucial! If you rush to the next step you will ruin your project!


Step Seven:
Put on the finishing touches. I outlined some of my patterned paper with a black Sharpie (you must do this after the Modge Podge dries. If you do it before the Modge Podge dries, it will smudge your marker lines). I also hot-glued some buttons onto the stars.

NOTE: I pre-threaded my buttons before gluing them onto the stars.

People thought I was crazy for doing this, but it really makes the diaper box a part of the room décor instead of an eye sore! I also decorated one for a little friend of ours who was starting kindergarten. I filled it with school supplies for her homework (crayons, pencils, erasers, etc.) She loved having a personalized box to keep her homework supplies away from her younger siblings. The best part was that she didn't know I repurposed a diaper wipe box!

Thanks to our designer Maegen Jenne. She did such a great job with a perfect idea for any woman with wipes! That means mostly all of us. Watch for more ideas from our design team to come!

January 8, 2010

Oh, What Fun It Is & Contest!

Hi! I am thrilled to be with you today! What an honor it is to be part of the QuicKutz blog. My name is Amber Packer. I am an Independent Designer and have the opportunity to work with some of your favorite manufacturers behind the scenes. I also appear regularly on a local television program called Good Things Utah. One of my favorite companies to work with is QuicKutz. I have had the privilege of demonstrating their newest products on Good Things Utah numerous times.

I am blessed to have two beautiful boys and a fabulous husband, good friends and health. It is also a blessing to be able to work (mostly) from home in an industry I love. It’s almost embarrassing to admit, but I get giddy when I see new products!

I’m wondering if you are like me. When I am looking at the many beautiful designs from QuicKutz my eyes get BIG and I want them all. I get tempted (it’s true) and sometimes I purchase a die that I don’t need right away, but I’m sure I’ll use later – and then I don’t use it. Please tell me I’m not the only one!

It seems silly, because it’s such a fabulous die, but the Sparkles die is one of those dies for me. Since one of my resolutions for next year is to use my new supplies along with supplies I already have, I knew I needed to use this die for today’s post.

Here is what I came up with:


My boys just LOVE this! As you can see, I have tied it to pegs on a shelf. I also thought about tying them to a wrought iron rod I have. There are so many fun ways to hang something like this.

I have also wanted to use my Epic (or Revolution) to cut felt since it’s such a huge trend right now. Guess what? It works! All the snowflakes you see on this project are felt. I found that the stiffer felt (usually glittered or self-adhesive) works best. Remember to remove the ejection foam to cut felt. You may need to shim the die as well.

Instructions:

1. Print four 4” x 6 photos” (I printed mine with a white border) and set aside.

2. Cut four 8” x 10” pieces of cross stitch fabric and spray with Frosty Night Glimmer. Mist. Roll over top pin on two 12” ribbon pieces per base and sew a border or two. Fray the ends.

3. Cut four 2 ¼” x 7 ½” strips of patterned paper (My Mind’s Eye Colorful Christmas).

4. Cut snowflakes from two different colors of felt using Sparkles die (REV-0261-S).

5. Cut four swirl borders from Prism Metallic cardstock (Metal Ore) using Contemporary Border die (CC-BDR-002).

6. Cut title from Prism Metallic cardstock (Midnight) using Mary Jane Grand Alphabet (CC-MARY-JANE-G).

7. Adhere as shown using your favorite liquid glue.

8. Add brads randomly (I used My Mind’s Eye Colorful Christmas brads).

9. Tie ribbon, hang and ENJOY!

QuicKutz would like to issue you a challenge! Would you like to win $100 (retail) in QuicKutz supplies of your choice?

Submit a project (layout, card, home décor, gift – your choice) using a “that” QuicKutz die–one you rarely or never use—by e-mailing asmith@quickutz.com by Monday, January 18, 2010.

QuicKutz will announce the winner on Wednesday, January 20, 2010.

Have a Happy New Year!

We want to thank Amber Packer for being a guest blogger on our blog! She is so talented and organized! For those of us lucky enough to live in Utah be sure to check her craft segments out on Good Things Utah daytime TV show. For those of you who do not live in Utah be sure to go check out her site for unbelievable ideas, out of the box thinking and great layouts & cards!

http://www.amberpacker.com/