
Each year, my class loves to listen to this version of an oral story, enhanced with an interactive element. This is all you need to incorporate a fun story of "Witches Brew" using an overhead Projector. Have fun with the script, alter it and make it your own. I drape the overhead with a black cloth and even dress up like a witch as well.
What do you need to gather:
-Overhead projector
-Red, yellow, green, blue food coloring
-Few drops of cooking oil
-ENO package
-Glass pie plate half filled with water to be placed atop of an overhead projector
-A few die cut shapes of witches, (bats too!) to lay on the overhead at the beginning of the story
-piece of yarn
-stir stick or a spoon
Be sure to tell the story slowly, using the directions within the story
Boys and girls, when summer is over and you are getting ready to go back to school the Halloween witches are also very busy making plans for Halloween. They gather around from all over the world, big witches, small witches, fat witches, ugly witches, silly witches and old witches.
All the witches hop on their broomsticks and fly far, far, far away to the cave of the oldest witch of all. Each one will bring a secret ingredient to be put in the pot of brew. The old witch is ready and waiting for the other witches. Her lazy black cat is asleep near the fireplace where a large pot is filled with water and hanging over the fire.
Would you look inside the pot?
-remove the witch die cuts from overhead and place the glass pie plate with water in it on the projector
Watch very carefully.
The ugly, old witch is saying "fellow witches, let's begin our brew. What have you brought with you to make it more horrible than last year? I am putting some green slime from the darkest
corner of my cave into it.
- drop two drops of green food coloring into the water.
"I have a drop of blood from a rat , "said the skinny little witch
- add a drop of red food coloring
"I will add some juice from this jar of rotten blueberry jam " said another witch.
- drop in some blue food coloring
Hey, hey, hey wait till you all see what I brought!!! It is a pair of eyes from two dead fish said another witch.
-add 4 small drops of cooking oil.
Let me add the spit from a coyote screamed the large witch.
- add three drops of yellow coloring
I will fool everyone with a few drops of ketchup, said another witch.
- add three drops of red food coloring
Here are a couple of snake eyes……and a snake! Yelled another witch
- add in two drops of cooking oil and the small piece of yarn.
I risked my life getting some rattlesnake poison, shouted one witch.
- add two more drops of yellow coloring
So, one by one the witches added their secret ingredients to the brew. The mean old witch carefully stirred.
- slowly stir the brew to swirl the colors.
The fire became hotter and hotter and soon the brew began to bubble and boil. If you listen carefully, you can even hear it.
-add in an ENO tablet to the plate. It will fizz and bubble for a minute, it will then turn the mixture black.
Now the witches cackled with glee as they hopped and danced around their horrible brew. Each one takes a vial of it, hops on her broomstick and flies off screaming "Happy Halloween."
Serve some homemade brew to the children that you have prepared prior to the story.
Homemade rootbeer or a lemonade with red food coloring is a great homemade brew idea!
Thanks to Ambassador Tamara Warner for this fun Halloween idea to use at a party or school.
October 30, 2009
October 28, 2009
from our haunted house to yours...

Today I made a Halloween treat to share with the neighbors. This recipe is from the Kids from Haiti Cookbook that QuicKutz published a few years ago. It has become a family favorite. I will share it at the bottom of the post for anyone who might be interested. And don't let it scare you...it is all done in the microwave!!


I used the new haunted house QK SHAPE-044-2.

Gathered my supplies...you really could use any kind of container...I just happened to have these boxes on hand...you just might recognize them!

I added this Halloween wish.
 The finished product! Happy Halloween to each of you!
Marshmallow Caramel Corn (shared by the Carroll Family)
1 cup butter
1 cup brown sugar
4 cups mini marshmallows
2 bags microwave popcorn (popped)
Melt butter in bowl in microwave. Stir in brown sugar. Microwave 2 minutes. Stir in 2 cups marshmallows. Cook 1 minute. In large bowl mix 2 cups marshmallows and popcorn. Pour sugar mixture over popcorn and mix well. Enjoy!
October 22, 2009
Creative Kick-starts for QuicKutz Chipboard

There are so many ways to embellish die cuts that you create using the QK chipboard sheets (ADH-SHEETS-06). Here are nine ideas to get you going:
1. Wrap it! Wrap your shape with twine, ribbon, string, or fibers. The adhesive side will help hold the fibers to your shape.
 2. Cover it up! Cut your shape with chipboard and cut it again with patterned paper, then layer the two shapes so the patterned paper is on top.
 3. Bring on the bling! You can dazzle by adding gems, rhinestones or pom poms to your chipboard shapes.
 4. Add texture! Use your QK embossing folders to add fun textures to your shape. Make the texture stand out more by inking or painting over it.
 5. Glitter! Expose the adhesive side of your shape and layer on the glitter for a grand effect.
 6. Gloss! After you cover, ink, or paint your plain chipboard you can give it one more level of dimension by adding a layer of gloss (such as Glossy Accents or Diamond Glaze) to make it shine.
 7. Pour on the paint! Acrylic paint, craft paint, or even Distress Crackle Paint add custom color and texture to your chipboard shapes without warping them.
 8. Flock it! Use loose flocking or crushed velvet texture to add warm fuzzies to your chipboard creations!
 9. Spritz it! Spray your shapes with Glimmer Mist or Maya Mist for a fast even color coating.
 There you have it....nine tips to get you started! With 18 sheets of chipboard in each package, you'll have enough supplies to come up with 99 ideas! Can't wait to see what all of you post in the QK Community Gallery! If you want your shapes to appear even thicker, you can cut multiple die cuts and layer them on top of each other. Sometimes it helps to remove the foam from your shape before cutting to get a cleaner cut through the chipboard.
Have fun!
Joyce McCall
QuicKutz Ambassador
October 14, 2009
da da da da....snap, snap!

We're creepy and we're cooky, mysterious and ooky...really, all-together spooky...the Adams family!
This week we have been decorating for Halloween around here and I thought it would be fun to take some spooky (okay, silly) photos of all of us. The kids loved the chance to be goofy for the camera.
I printed the photos off on regular white copy paper, which added to the vintage look that I had in mind. Then our 5 year old got to "decorate" the photos with some fun Halloween details...oh, you should have heard the giggles!


I framed them in the frame from the recent Halloween release (CC-SHAPE-045-1). I cut the frame out in dark brown cardstock and ran some black ink over the edges. Next I mounted them on some foam core and stuck them to the wall using some removable sticky tack.

Of course the project wasn't complete until I added cotton spider webs. It was a fun project for us to do together as a family. Try it with your little spooks!!

October 13, 2009
Winner Winner Chicken Dinner
Congratulations to our lucky winners! Stay tuned for more fabulous QuicKutz contests.
Kirk's Disneyland Layout Titles:
Winner #1:
Kirk's Disneyland Layout Titles:
-
#1 "WITCH way to Disneyland?"
#2 "The wonderful thing about Tiggers...."
#3 "Princess for a Day"
#4 "Who's the big duck in the middle?"
or, "Duck, Duck, Goose"
Winner #1:
"Hello! I just received my new epic 6 tool recently...my very first die cutting system the only problem is I only have one embossing folder and one die cut plate. I would love to have the embossing folder that you used in your layout the retro diamond. Thanks for this chance." Angela
Winner #2:
"I'd have to say the spiderweb border or the graveyard folder because I just LOVE Halloween!"
October 12, 2009
Homemade Leaves
Fall is one of my favorite times in Michigan 


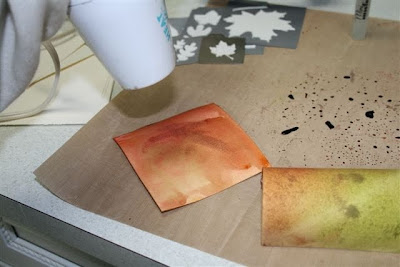


It is cold and windy here, so I am enjoying some time in my craft room while thinking about the changes going on around me. I've recently created some fun backgrounds that are perfect for die-cutting fall leaves. I would like to share this technique with you today.
Let's first assemble our supplies:
Light cardstock- creams and tans work (cut into 4x4 and 2x2)
3-5 Ranger distress inks (orange, green, yellow, brown, and red shades provide a nice palette)
Mini mister or spritzer bottle filled with water
Craft mat, or other non-poruous work surface that you can apply inks directly onto
Heat tool of some sort
QK tool
Assortment of leaf dies

Step 1:
Directly apply your ink to your craft mat. I like to place the ink-side down, apply a bit of pressure, give a ½ turn and lift. Apply a second color close to the first (but careful not to touch the two colors, thus avoiding transfer of the first color to your pad.) Then apply a third color.

Step 2:
Lightly mist the ink. (It will bead up a bit.)
Step 3:
Pick up a piece of your textured or smooth cardstock and place it in the center of your misted inks. While keeping it down, twist and turn it to transfer the ink from your work surface to your paper. Take a peek, if it's not completely covered with ink, place it back down and twist again. Your cardstock should now be wet with the blended ink. If you prefer more color, you may repeat the first step, but be cautious that you don’t end up with a muddy brown.

Step 4:
With a dry paper towel, wipe the remaining ink off your work surface. Dry your cardstock using a heat gun.

I like to prepare a selection of backgrounds before I cut my shapes. You can achieve different looks depending on your ink selection, paper color and texture.

Step 5:
Choose your die(s) and assemble on your platform, apply paper, cover with your cutting mat and turn the handle.

You will soon have as assortment of leaves to use on your fall projects!

I need to take care of some “Mom Duties”, but I will meet up with you in the Community Gallery later to share a layout or two using my leaves.
Hope you enjoy!
Off and running,
Sandy, QK Ambassador
October 9, 2009
Paper doll fun
I have been given the fun task of blogging. I don’t normally blog, so please bear with me!


First off—just a little bit about me. I’m a Taurus, I like long walks on the beach, and I like to find the essence from within… No, seriously, I am a Taurus and my wife and I love taking walks on the beach. (Who doesn’t?) We just celebrated our eighth anniversary, and we are expecting our first child (a boy). I am new to QuicKutz, but I have been doing sales and retail for over ten years, so even though QK is new to me I feel right at home.
Since my wife is expecting, my sister threw her a baby shower where one of the activities was to make paper dolls from our new October release. This activity was a chance for me to receive great feedback on both the Epic 6 tool and our new paper doll release from women who are new to QK products and scrapbooking.
And the response was great! I had two of our Epic 6 demo tools there for the women to use and they spent a couple of hours cutting away and making some cute dolls….and some “interesting” dolls, too. : )
These women had a lot of fun being creative and mix ‘n matching the clothing, as only women can do! One of the ladies had a great idea to put magnets on the back of both the doll and the clothing so she could put them on her fridge and let the kids change the clothes as often as they want. Great fun was had by all, and I was once again reminded how versatile QK products are in every situation.


October 5, 2009
Holiday kick-off
Wow! I can't believe we are already in October! My how 2009 has passed. I know 2009 has brought about many changes for most of us on a personal and a professional level. Our company has gone through many changes and challenges, too. But things are looking better than ever, and we’re excited for the holiday season and the great items scheduled to arrive in our warehouse over the next couple of months.
Our new L Letterpress will be arriving. We have a whole slew of Epic Six tools coming into our warehouse. The 2009 Holiday Gift Sets will be announced at the beginning of November and I think you’ll find these will be the most versatile sets yet. Exclusive products for Thanksgiving and Christmas will soon roll into our warehouse, as well.


Our new L Letterpress will be arriving. We have a whole slew of Epic Six tools coming into our warehouse. The 2009 Holiday Gift Sets will be announced at the beginning of November and I think you’ll find these will be the most versatile sets yet. Exclusive products for Thanksgiving and Christmas will soon roll into our warehouse, as well.
My family and I decided to kick off this holiday season by going to
Upon returning from our fun-filled week in
Kirk


October 1, 2009
More than meets the eye...

Ta Da! It feels like it's been a while since I sat down and did a scrapbook layout just for me! I almost forgot how much fun it is. Pretty basic, right? (Typical Amy. I like a lot of white space.) I used the old Monograms for the 'W' and my favorite alphabet, Marigold, for the 'altons' and "I just love 'em" was cut out in Oatmeal.
But wait... This scan is a good overview, but it blows out a lot of the cool detail.
 Check out this sweet pattern from the QK embossing folders. (The photo shows it much better.) I LOVE, LOVE, LOVE this pattern. It's the Retro Diamonds border embossing folder (EF-BDR-028) and it totally matches the pattern on my paper. I also love the retro squares and the hounds tooth and the dots.... well, there are a lot. They're the perfect accents for my simple style. Which embossing folders best fit your style? ...because I just may have some for one lucky commenter.
Subscribe to:
Posts (Atom)


