
I must say, I love Amber Packer’s Spring Tree featured on the QuicKutz blog earlier this month! I love the twigs—how cool is that with her embellished eggs?! Her post inspired me to get out my own tree and decorate it. The tree I’m using is called The Tree of Life. I bought it from my local scrapbook store with the intentions of decorating it for each holiday. Well, that was back in November and now I’m finally getting around to it!
 First, I gathered my supplies. I knew I wanted to use fabric on my tree and I also had some thin wood veneer I thought would look cool.
 My supply list:
QuicKutz Nesting Eggs
Flowers Rev-0016
Birds Rev-0143
Butterfly Rev-0166
Beads Border 014
Scallops Border 009
Cardstock
Patterned paper
Flocked paper
Wood veneer
Fabric
Ribbon and twine
Buttons
Stick pins
Maya Mist
Ink pads and stamps
Now for the fun part—coloring eggs! I cut my eggs from various materials. The fabric cut like a charm through my Epic tool, as did the wood veneer. I also cut cardstock eggs to back the fabric eggs, giving them more stability and a nice finished look.
For my first egg, I used adhesive-backed fabric and pulled out my sewing machine. Yikes! I am not a seamstress by any means! My husband does the mending in our house. I can’t sew a straight line for the life of me! But, I said to myself, “That’s okay, Julie. Just have fun!” Sew (haha), I pinned ruffles out of my ribbon and sewed it onto the fabric egg.
 I embellished with a button and punched a hole at the top of the egg for the ribbon.
 When I cut the wood veneer egg, I knew I wanted to use twine and stamps with it. First, I stamped a pennant banner across the egg and then stamped a birdie sitting on the banner. (Banners are all the rage right now! I’m seeing them in all kinds of craft projects and they are so cute!)
 I then finished it off with the twine wrapped around the egg. And again, punched a whole for ribbon at the top to hang my egg on the tree.
 I decorated more fabric eggs with flowers using the Rev0016 flower die. I cut the flowers from cardstock and patterned paper, crumpled them for more dimension and then layered them.
 Once again, I used my sewing machine to sew a circle pattern in the middle of the flower. (Remember how I said I wasn’t good with the sewing machine? Well, it’s not a great circle pattern—it’s just kind of a random circle.)
 I then adhered my flower to the fabric egg and embellished it with a button.
 The next egg is a birdie egg, which I feel like is so cute, and so easy!
I cut the birdie from white-flocked paper and then cut the wing from fabric. I sewed the wing on with a zigzag stitch—now I was getting fancy with that sewing machine!
 I adhered the bird to my fabric egg and used a bead for the eye. On all the fabric eggs, I frayed the edges just a little to give them more texture.
 The last egg I made has more traditional coloring. I spritzed the eggs with three different colors of Maya Mist. (I’ve also seen use of the Maya Mist a lot lately—I felt it was perfect for egg-decorating.) I used Cornflower, Cotton Candy and Cream mists and they gave a blue, pink and yellow color to my ivory cardstock egg. I always mist in a shallow box to keep the mist from getting all over the place. As you can tell, I’ve used that box for a lot of misting projects!
 To decorate the misted eggs, I layered a bead border over a scalloped border (using QuicKutz Cookie Cutter Border Dies) and then embellished with beads.
 I felt the eggs I created were great for my tree, but it needed something else, so I cut some butterflies from cardstock and layered them with patterned paper. I then sewed a zigzag stitch down the center of each butterfly.
 I then embellished the butterflies with stickpins. The pins stick right in between the stitches on the butterfly and add a little bling to them.
 Decorating the tree was fun and I had a little help from my 3-year old neighbor. She hung the eggs, and I rearranged them! I placed the butterflies on the tree and I still felt it needed a little something, so I tore strips of fabric and randomly tied them on the tree.
 The tree now sits on my foyer table and adds a nice festive feel to the room. Now just to decorate it for the next holiday!
For my first egg, I used adhesive-backed fabric and pulled out my sewing machine. Yikes! I am not a seamstress by any means! My husband does the mending in our house. I can’t sew a straight line for the life of me! But, I said to myself, “That’s okay, Julie. Just have fun!” Sew (haha), I pinned ruffles out of my ribbon and sewed it onto the fabric egg.
 I embellished with a button and punched a hole at the top of the egg for the ribbon.
 When I cut the wood veneer egg, I knew I wanted to use twine and stamps with it. First, I stamped a pennant banner across the egg and then stamped a birdie sitting on the banner. (Banners are all the rage right now! I’m seeing them in all kinds of craft projects and they are so cute!)
 I then finished it off with the twine wrapped around the egg. And again, punched a whole for ribbon at the top to hang my egg on the tree.
 I decorated more fabric eggs with flowers using the Rev0016 flower die. I cut the flowers from cardstock and patterned paper, crumpled them for more dimension and then layered them.
 Once again, I used my sewing machine to sew a circle pattern in the middle of the flower. (Remember how I said I wasn’t good with the sewing machine? Well, it’s not a great circle pattern—it’s just kind of a random circle.)
 I then adhered my flower to the fabric egg and embellished it with a button.
 The next egg is a birdie egg, which I feel like is so cute, and so easy!
I cut the birdie from white-flocked paper and then cut the wing from fabric. I sewed the wing on with a zigzag stitch—now I was getting fancy with that sewing machine!
 I adhered the bird to my fabric egg and used a bead for the eye. On all the fabric eggs, I frayed the edges just a little to give them more texture.
 The last egg I made has more traditional coloring. I spritzed the eggs with three different colors of Maya Mist. (I’ve also seen use of the Maya Mist a lot lately—I felt it was perfect for egg-decorating.) I used Cornflower, Cotton Candy and Cream mists and they gave a blue, pink and yellow color to my ivory cardstock egg. I always mist in a shallow box to keep the mist from getting all over the place. As you can tell, I’ve used that box for a lot of misting projects!
 To decorate the misted eggs, I layered a bead border over a scalloped border (using QuicKutz Cookie Cutter Border Dies) and then embellished with beads.
 I felt the eggs I created were great for my tree, but it needed something else, so I cut some butterflies from cardstock and layered them with patterned paper. I then sewed a zigzag stitch down the center of each butterfly.
 I then embellished the butterflies with stickpins. The pins stick right in between the stitches on the butterfly and add a little bling to them.
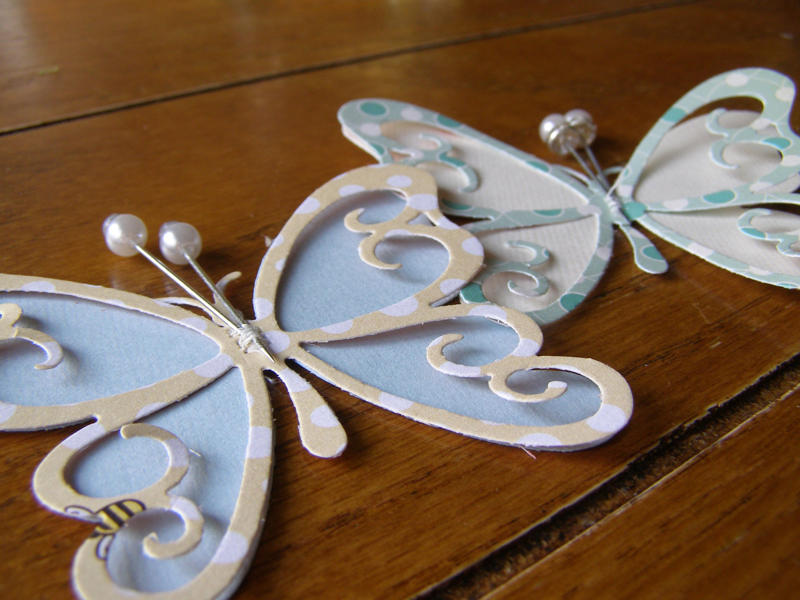 Decorating the tree was fun and I had a little help from my 3-year old neighbor. She hung the eggs, and I rearranged them! I placed the butterflies on the tree and I still felt it needed a little something, so I tore strips of fabric and randomly tied them on the tree.
 The tree now sits on my foyer table and adds a nice festive feel to the room. Now just to decorate it for the next holiday!
 A special thanks to Design Team member Julie for this darling project!


